Machining Center
Transforming Industries with Superior Machining Technology (Step into the future with our cutting-edge machining centers, designed for both versatility and precision in manufacturing. Perfect for industries demanding the highest standards. See how our technology can advance your projects)
1. Plastic Injection Mold and Products
- Polyethylene (PE) – Durable, chemically resistant, used in containers, bottles.
- Polypropylene (PP) – Lightweight, heat resistant, ideal for automotive parts, consumer goods.
- Polyvinyl Chloride (PVC) – Strong, versatile, used in plumbing, medical devices.
- Polystyrene (PS) – Cost-effective, easy to mold, used in packaging, disposable containers.
- Acrylonitrile Butadiene Styrene (ABS) – Tough, impact-resistant, used in electronics, toys.
- Polycarbonate (PC) – Extremely durable, used in bullet-proof glass, eyewear.
- Polyamide (Nylon) – High mechanical strength, used in automotive components, textiles.
- Thermoplastic Rubber (TPR) – Flexible, recyclable, used in footwear, seals.
- Polyoxymethylene (POM) – High precision, fatigue resistance, used in gears, fasteners.
- Polyethylene Terephthalate (PET) – Excellent clarity, strength, used in bottles, packaging.
- Acrylic (PMMA) – High transparency, weather-resistant, used in signage, displays.
- Thermoplastic Polyurethane (TPU) – Elastic, durable, used in automotive parts, medical devices.
Each material is chosen based on its specific properties like strength, flexibility, and resistance to chemicals, temperatures, and impact, making them suitable for various applications across industries.
Plastic injection molding is a manufacturing process used to produce large volumes of identical plastic parts. The core of the process involves injecting molten plastic material into a mold at high pressure. Once in the mold, the plastic cools and solidifies into the final part shape.
This method is highly efficient for mass production because it allows for quick production of parts with a high degree of accuracy and repeatability. The initial setup costs are significant due to the need for precise molds and tooling; however, these costs are offset by the economies of scale in high-volume production. Plastic injection molding is widely used across various industries including automotive, medical, consumer goods, and electronics due to its versatility in working with a diverse array of plastic materials and its capability to create complex geometries with minimal waste.
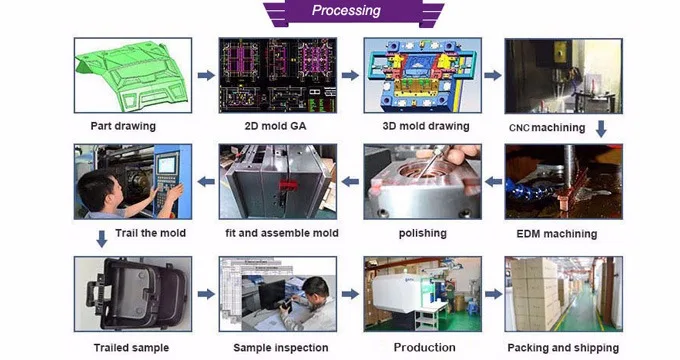
Building a mold for custom plastic products involves several critical steps to ensure the quality and precision of the final product:
Design: Begin with a detailed design of the part you intend to manufacture. Use CAD software to create precise drawings that include all dimensions and features.
Material Selection: Choose the appropriate mold material based on the expected production volume and the plastic material to be molded. Common mold materials include steel for high volumes due to its durability, and aluminum or pre-hardened steel for shorter runs.
Mold Design: Develop a mold design that considers factors like draft angles, gating, and ejection systems. This stage often involves simulations using CAD and CAM software to predict flow and cooling patterns and to optimize the mold for manufacturing.
Machining: Once the design is finalized, machine the mold using CNC milling. This process involves cutting the mold cavity and core from the selected material based on the final mold design.
Finishing Touches: After machining, the mold undergoes finishing processes such as polishing and texturing to achieve the desired surface quality. Cooling and heating channels are also added to control the temperature during the injection process.
Assembly and Testing: Finally, assemble the mold components and install it in the injection molding machine. Conduct tests to check for defects and ensure the mold produces a quality product as designed.
Building a mold is a complex process that requires precision engineering and understanding of both product design and plastic behavior.

FAQ: Common Quality Issues in Plastic Injection Mold and Products
What are common quality issues in plastic injection molding?
Key issues include warping, sink marks, short shots, and flash formation.
What causes sink marks, and how can they be avoided?
Sink marks arise when the interior of the molded part cools and shrinks more than the surface, often due to thick sections. To avoid sink marks, maintain uniform wall thickness, optimize the holding pressure and time, and consider using a material with a lower shrinkage rate.
How can warping be prevented in injection molding?
Warping occurs due to uneven cooling of the molten plastic in the mold. To prevent this, maintain uniform wall thickness in the design and optimize cooling system design in the mold. Ensure consistent processing conditions during the cycle.
What leads to short shots in the molding process?
Short shots occur when the mold does not fill completely, typically due to insufficient material, low shot volume, or inadequate venting. Enhance the flowability of the plastic, increase the injection speed or pressure, and ensure proper venting in the mold design.
Why might the hole dimensions be inaccurate, and how can this be corrected?
How can flash formation be prevented in injection molds?
What measures can be taken to improve the surface quality of injection molded parts?
Improving surface quality can be achieved by optimizing the mold design, using higher quality materials, and controlling processing parameters like temperature and injection speed. Additionally, consider using mold release agents or surface treatments post-molding.
By implementing these strategies, how is production affected?
Adopting these measures can significantly reduce defects, improve the overall quality of the plastic injection molded parts, and enhance production efficiency by minimizing waste and rework.
2. Sheet Metal Machining,Power Distribution Cabinet
Material Selection: Choose materials based on environmental conditions and required durability. Common choices include stainless steel for corrosion resistance and aluminum for lightweight strength.
Design for Manufacturability: Simplify designs to minimize waste and reduce costs. Incorporate features like bends and folds instead of welds to increase strength and reduce assembly time.
Proper Tolerances: Establish realistic tolerances to ensure parts fit together correctly without excessive gaps or overlap, considering factors like the thickness of the material and bending radii.
Finish and Coatings: Select appropriate finishes and coatings to enhance corrosion resistance, electrical conductivity, and aesthetic appeal. Options include powder coating, anodizing, and galvanizing.
Ventilation and Cooling: Design adequate ventilation to prevent overheating in electronic enclosures, using louvers or fan cutouts as necessary.
Accessibility: Ensure that doors, panels, and covers are easily accessible for installation and maintenance. Use features like hinges and latches that can withstand repeated use.
Types:
- Wall-mounted: Compact and used in smaller spaces.
- Free-standing: Larger and used for extensive network connections.
- Outdoor: Designed with weather-resistant materials for external use.
Fabrication:
- Typically made from materials like stainless steel or aluminum for durability and corrosion resistance.
- Fabrication involves precision cutting, bending, and assembly, often using CNC machinery to ensure accuracy.
Uses:
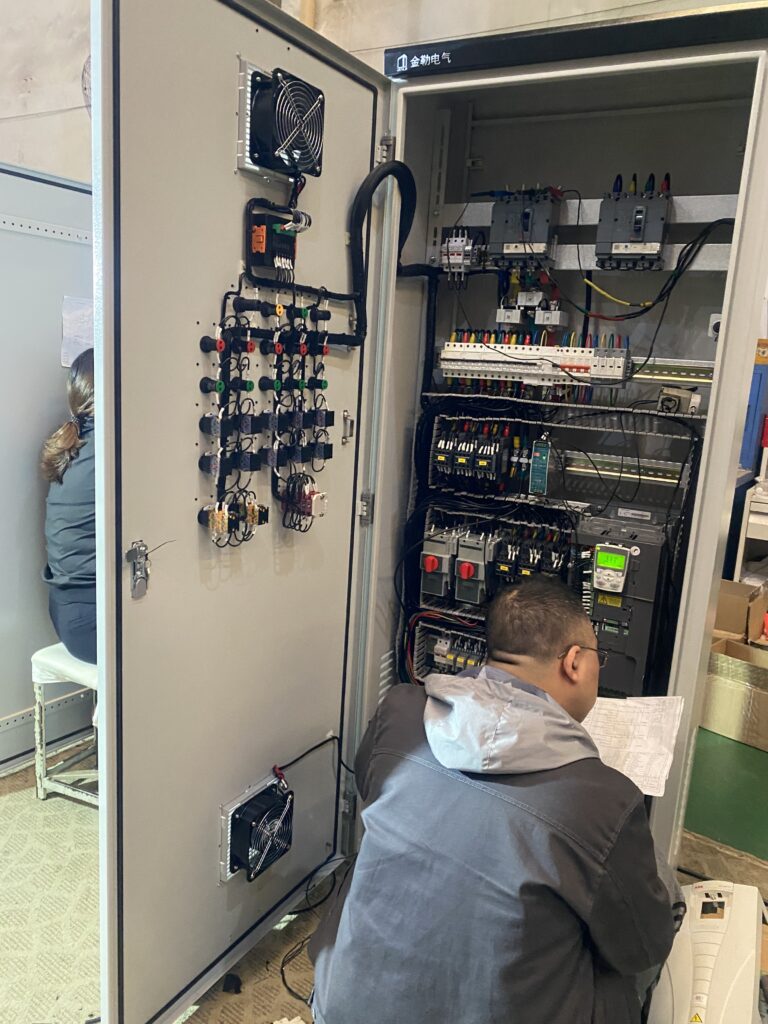
- Electrical: Houses and protects termination points of electrical wiring. Essential for distributing power within buildings and facilities.
- Telecommunications: Encloses wiring junctions and fiber optic terminations to ensure stable network operations.
- Industrial: Used in factories to manage power distribution to machinery and equipment, often customized to handle higher power capacities.
Functionality:
- Designed to centralize control of electrical power distribution.
- Equipped with switches, fuses, and circuit breakers to manage power flow and protect against overloads.
Construction:
- Made from robust materials like steel or aluminum, ensuring durability and resistance to environmental factors.
- Features precision-engineered doors and locking systems for security and safety.
Applications:
- Widely used in industrial settings to distribute power to machinery.
- Essential in commercial buildings for routing power to different floors or sections.
- Utilized in outdoor settings, customized for weather resistance to protect against elements.

FAQ: Common Quality Issues in Sheet Metal Fabrication
What are common quality issues in sheet metal fabrication?
Common issues include deformation, scratches and surface damage, cracks, inaccurate hole dimensions, and rough surfaces.
How can deformation be prevented during sheet metal fabrication?
Deformation is typically caused by uneven cutting forces and heat treatment. To prevent this, optimize the processing order by performing major cuts first followed by finer machining. Use appropriate fixtures to securely hold the material, reducing stress during the process.
What causes scratches and surface damage, and how can they be avoided?
Scratches and surface damage often result from improper handling or insufficient surface protection. To avoid these issues, use new or properly maintained tools and equipment. Applying a protective film to the material surface before processing can also help ensure that operations are carried out carefully.
What leads to cracks in sheet metal, and what are the solutions?
Cracks may develop due to substandard material quality or overly rapid cooling during processing. Select high-quality materials and control the machining speed and cooling rate to prevent this. Preheating materials before processing can also minimize temperature-related stresses.
Why might the hole dimensions be inaccurate, and how can this be corrected?
Inaccurate hole dimensions can arise from wear and tear on the machine or incorrect settings. Regularly calibrate machinery and verify settings to maintain accuracy. Conducting trial runs before each production batch ensures that all equipment is correctly adjusted.
What causes rough surfaces, and how can they be improved?
Rough surfaces are generally the result of worn tools or inappropriate cutting parameters. Replace or sharpen tools as needed and adjust cutting parameters to suit the material being processed. Regular tool checks and updates to cutting parameters can significantly enhance surface quality.
By implementing these strategies, how is production affected?
Applying these measures not only addresses the common problems encountered in sheet metal fabrication but also significantly enhances production efficiency and product quality.
3. 3D Printing Machines
Prosthetic Limbs:
- Custom-fit prosthetics are more accessible and affordable thanks to 3D printing, greatly improving the quality of life for amputees.
Aerospace Components:
- Companies like Boeing and SpaceX use 3D printing for parts that are lighter and stronger, significantly enhancing aerospace efficiency.
Customized Eyewear:
- Eyewear manufacturers are using 3D printing to create frames that are tailor-made to the wearer’s facial measurements, offering superior comfort and style.
Dental Implants and Orthodontics:
- Dental products such as crowns, bridges, and aligners are custom-fabricated with high precision to fit individual patients perfectly.
Architectural Models and Functional Parts:
- 3D printing is extensively used in architecture for creating detailed models and in construction for producing complex building components.
These products highlight the diverse applications of 3D printing across various industries, emphasizing its role in customization, innovation, and functional design.
Fused Deposition Modeling (FDM):
- Melts and extrudes thermoplastic filament layer by layer to build objects. It’s widely used due to its cost-effectiveness and straightforward process.
Stereolithography (SLA):
- Uses an ultraviolet laser to cure liquid resin into hardened plastic in a layer-by-layer process. Known for high precision and smooth surface finishes, ideal for detailed prototypes and art objects.
Selective Laser Sintering (SLS):
- Fuses powder particles together using a laser, without the need for support structures. It’s excellent for complex geometries and functional parts made from plastics, glass, ceramics, or metals.
Digital Light Processing (DLP):
- Similar to SLA but uses a digital light projector to cure resin, which speeds up the printing process. It achieves high accuracy and is used in dental and jewelry industries.
Multi Jet Fusion (MJF):
- Developed by HP, this technology spreads layers of powder and then sprays a binding agent that is simultaneously fused by heating elements, producing robust and detailed parts rapidly.
PLA (Polylactic Acid):
- Biodegradable thermoplastic derived from renewable resources. Ideal for consumer goods and educational models due to its low melting temperature and ease of use.
ABS (Acrylonitrile Butadiene Styrene):
- Strong, durable, and temperature-resistant, making it suitable for automotive components and household appliances.
Nylon:
- Known for its flexibility and strength, used extensively in functional parts and tools due to its durability and resistance to abrasion.
TPU (Thermoplastic Polyurethane):
- Flexible and elastic material that is perfect for items requiring rubber-like properties such as footwear, automotive parts, and medical devices.
Resins:
- Offer fine details and smooth surfaces, commonly used in jewelry, dentistry, and other applications needing high precision.
Metal:
- Stainless steel, titanium, and other metals can be 3D printed for aerospace, automotive, and medical implants, offering high strength and thermal properties.


FAQ: Common Quality Issues in 3D Printing Machines
What are common quality issues in 3D printing?
Typical issues include warping, stringing, layer misalignment, and poor surface finish.
How can warping be prevented in 3D printing?
Warping occurs due to uneven cooling and contraction of the printed layers. To prevent this, use a heated print bed, ensure proper bed adhesion, and maintain a consistent ambient temperature during printing.
What causes stringing, and how can it be avoided?
Stringing happens when small strings of material are left between separate parts of the print, usually due to oozing of melted material. To avoid stringing, fine-tune the retraction settings on the printer, adjust the printing temperature, and optimize travel speed.
How can layer misalignment be corrected in 3D printing?
Layer misalignment, or shifting layers, can be caused by loose belts, improper bed leveling, or vibrations. Ensure all moving parts are secure and well-calibrated, the print bed is level, and the machine is placed on a stable surface.
What steps can be taken to improve surface finish in 3D prints?
Improving surface finish may involve several strategies such as using higher resolution settings, sanding after printing, using quality filament, and optimizing print speed and temperature to reduce imperfections.
How can the accuracy of 3D printed parts be enhanced?
Accuracy can be improved by calibrating the printer regularly, using high-quality and appropriate materials, and optimizing the print settings like layer height and infill density based on the specific requirements of the part.
By implementing these strategies, how is production affected?
Applying these measures not only addresses the common problems encountered in sheet metal fabrication but also significantly enhances production efficiency and product quality.
4. CNC Machine Processing & Machining
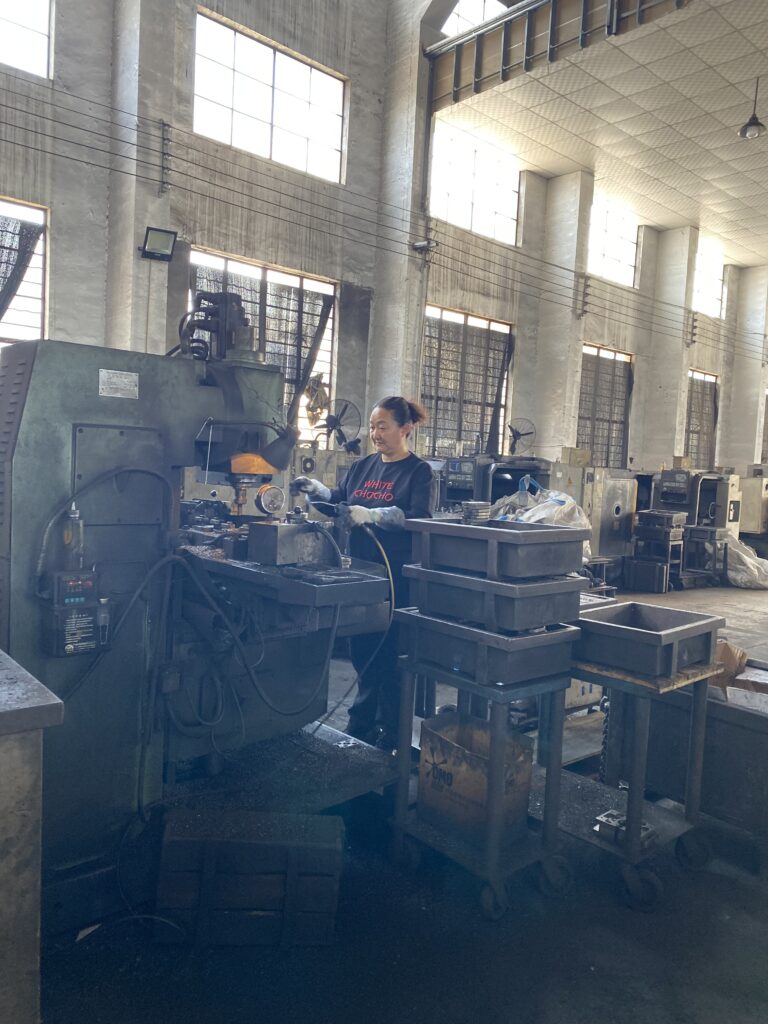
Fundamental Training: Start with learning the basics of CNC operations, including understanding CNC programming, reading blueprints, and familiarizing yourself with different materials and tools.
Hands-On Experience: Gain practical experience with various CNC machines like mills, lathes, and routers. Work on diverse projects to understand the intricacies of each operation.
Advanced Programming Skills: Develop skills in advanced CNC programming languages such as G-code or M-code, and learn to use CAD/CAM software efficiently to design and program complex parts.
Optimization Techniques: Learn about optimization strategies for enhancing machining efficiency, such as selecting optimal cutting conditions, tool paths, and minimizing machine setup time.
Maintenance Knowledge: Understand machine maintenance to ensure equipment operates at peak performance, reducing downtime and extending machine lifespan.
Continuous Learning: Stay updated with the latest CNC technology and trends, and continuously improve your skills through courses and certifications.
Tool Selection: Choose the right broach tool for your material and desired finish. High-speed steel (HSS) broaches are common, but carbide broaches can offer longer life and faster cutting speeds.
Machine Compatibility: Ensure your CNC machine can accommodate broaching operations. This typically involves checking the spindle orientation and power for vertical or rotary broaching setups.
Programming Precision: Use precise CNC programming to control the broach’s path and depth. This includes setting correct feed rates and speeds to prevent tool wear and achieve clean cuts.
Fixture Rigidity: Use rigid fixtures to securely hold the workpiece during broaching. This prevents movement and vibration, which can affect the quality of the broached slots or shapes.
Lubrication and Cooling: Properly lubricate and cool the broach tool during operations to reduce friction and heat buildup, which can affect tool life and finish quality.
Precision and Automation: CNC stands for Computer Numerical Control. It brings precision and automation to the machining process, allowing for high accuracy, repeatability, and production of complex parts.
Programming: Machines are controlled via a language known as G-code, which guides their operations such as speed, feed rate, and coordination.
Versatility: CNC machining is versatile and used across industries like aerospace, automotive, and electronics for creating detailed and durable components.
Benefits: The key benefits include reduced manual labor, enhanced accuracy, increased production speed, and flexibility in manufacturing complex shapes.
Setup: Though the initial setup and programming can be intensive, once configured, CNC machines can continuously produce parts with minimal supervision.

FAQ: CNC Machine Processing & Machining
What are common quality issues in CNC machining?
Common issues include tool marks, burrs, chatter marks, and dimensional inaccuracies.
How can tool marks be minimized in CNC machining?
Tool marks are often a result of improper tool paths or worn-out tools. To minimize them, ensure using sharp, appropriate tools for the material and operation, and optimize tool paths for smoother transitions.
What causes burrs, and how can they be avoided?
Burrs are small ridges or protrusions on a part’s edge resulting from cutting operations. They can be avoided by using sharp tools, adjusting cutting parameters such as speed and feed rate, and employing proper finishing processes.
How can chatter marks be prevented in CNC machining?
Chatter marks, or vibrations during machining, can be prevented by ensuring all components are tightly secured, using the right cutting parameters, and employing dampening techniques if necessary to stabilize the operation.
What steps can be taken to improve dimensional accuracy in CNC-machined parts?
Improving dimensional accuracy involves careful calibration of machines, regular maintenance to ensure mechanical precision, and the use of high-quality, calibrated measuring tools to check and adjust the process as needed.
How can the surface finish of CNC machined parts be enhanced?
Enhancing surface finish can be achieved by selecting appropriate cutting tools and conditions, such as using finer, sharper tools and adjusting speeds and feeds. Post-processing techniques like polishing or sandblasting can also be employed.
By implementing these strategies, how is production affected?
Adopting these measures leads to higher quality machining, reduced rework, and lower waste, ultimately enhancing production efficiency and product reliability in CNC machining operations.
5. AUTO PARTS & WIRE HARNESS
Problem: In high-volume production, maintaining consistent quality in every wire harness can be challenging due to variations in material quality, human error, and equipment performance.
Solution: To ensure consistent quality, we employ automated quality control systems that include real-time monitoring and testing of each harness. This includes electrical testing for continuity and insulation breakdown, as well as physical inspections to detect any defects in crimping, cutting, and assembly.
Prevention: To prevent quality issues, we standardize production processes and conduct regular training for our staff. We also perform routine maintenance on equipment to prevent downtime and defects. By using statistical process control (SPC), we can detect and correct deviations from quality standards early in the production process. This proactive approach ensures that every harness meets our stringent quality criteria before it leaves the factory floor.
Our facility employs advanced automated cutting and crimping machines that are programmed with precise specifications to ensure each wire is cut and crimped to exact lengths and dimensions. This not only minimizes waste but also guarantees consistent quality across all products. We regularly calibrate our equipment and conduct rigorous quality checks as part of our commitment to maintaining high standards in our production line.
To combat common assembly errors such as incorrect wire terminations and insufficient connector installations, we have implemented a combination of manual inspections and automated testing procedures. Each harness is visually inspected by skilled technicians and tested using electrical test systems that check for continuity, correct pin placement, and insulation integrity. This dual approach ensures that any potential issues are identified and corrected before leaving the production floor, enhancing reliability and reducing the risk of costly recalls.


FAQ: Quality Issues in Automotive Wire Harness Production
What are the common quality issues in wire harness production?
Common issues include incorrect wiring connections, terminal exit problems, and physical damage to wires and connectors. These defects can lead to electrical failures and unreliable vehicle performance.
How can incorrect wiring connections be prevented?
Implementing automated wire checking systems can reduce human errors. Regular training sessions for assembly staff on correct wiring practices and detailed work instructions are also crucial.
What steps are taken to ensure quality control in terminal connections?
Quality control measures include the use of precision tools and fixtures to ensure accurate crimping and secure connections. Additionally, each batch of terminals is tested for pull-out strength and electrical continuity.
How is the risk of physical damage to wires and connectors minimized?
Physical protection measures such as conduit and abrasion-resistant sleeving are used. During the assembly process, care is taken to ensure that wires are not overstressed or bent beyond their capacity.
What quality assurance processes are in place to detect potential issues early?
Production lines are equipped with continuous monitoring systems that include visual and electrical testing. This helps in detecting and addressing defects early in the manufacturing process.
How do you handle quality issues when they arise?
In wire harness production, quality issues are addressed through a combination of proactive and reactive measures. Initially, rigorous testing and inspections are conducted at various stages of the manufacturing process, from raw materials to final assembly. If defects are identified, root cause analysis is performed to determine the source. Solutions may include retraining staff, adjusting machinery, or refining quality control procedures. Continuous improvement practices and feedback loops are critical to preventing future issues and enhancing overall product reliability.
How are environmental stress factors managed in wire harness production?
To mitigate the impact of environmental stressors like vibrations, moisture, and temperature fluctuations on vehicle wire harnesses, it is essential to utilize advanced, durable materials designed for harsh conditions. Robust design standards should be implemented to ensure the longevity and reliability of the harnesses. Additionally, rigorous environmental testing during development identifies potential failure points, and ongoing advancements in material science and protective measures, such as improved insulation and waterproof connectors, are crucial for enhancing performance and safety.
Prevention Strategies
- Regular Training: Continuous training of staff to handle new technologies and methods.
- Advanced Testing: Incorporating advanced testing and inspection techniques at multiple stages of the production process.
- Supplier Quality Management: Rigorous quality checks on raw materials and components from suppliers to ensure they meet required specifications.
6. Roll forming process
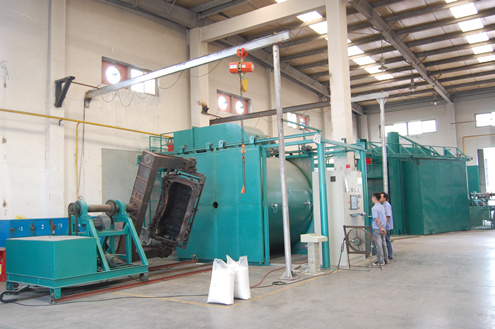
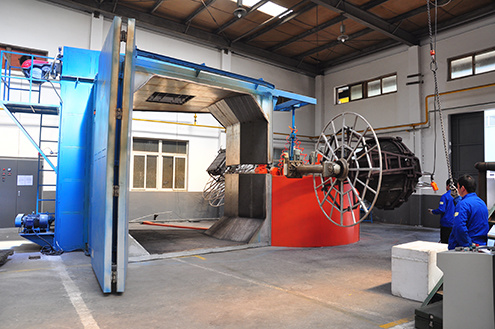
Rotational moulding which is a high temperature, low volume, lowpressure thermoplastic forming process .A pre-measured thermoplastic resin is loaded into the mould, heated while rotating on a vertical and horizontal axis, this melts the polymer causing it to evenly coat the surface of the mould giving the product its required shape and thickness, cooled to a desired temperature in a separate chamber, then the product is removed from the mould.
- The mold is simple and cost-effective, suitable for forming large plastic products.
- Suitable for the production of multiple types of plastic products, the rotary molding process has greater flexibility compared to other molding methods.
- Suitable for shaping products with complex shapes.
- Save raw materials. Each time, the raw materials are directly added to the mold for rotational molding. After the molding is completed, the product is taken out and the required raw materials are added for the next time. It does not waste raw materials, nor does it require time to clean machines and molds.
- The wall thickness of the product is uniform and seamless. Compared with other plastic molding processes, the wall thickness of the roll molded product is uniform. Due to integrated molding, the product does not have fusion lines.
- The product has no residual stress and is not prone to deformation.
The rotary molding process typically uses thermoplastic resins such as polyethylene (PE), polypropylene (PP), and polyvinyl chloride (PVC).


FAQ: Quality Issues in Rotational molding
What are the common quality problems in roll forming process?
Common problems include uneven wall thickness, appearance of fusion lines, generation of bubbles or pores, unstable size or deformation.
Why do products formed by rotation have uneven wall thickness?
Uneven wall thickness may be due to inaccurate mold positioning, uneven heating or cooling, or imbalanced resin distribution. The solution includes redesigning or calibrating the mold to ensure its correct position, optimizing the heating and cooling processes to ensure temperature uniformity, and adjusting the rotation speed and time to improve the distribution of resin within the mold.
Why do products formed by rotation have bubbles or holes?
Bubbles or holes are usually caused by insufficient discharge of air or water vapor inside the material during the heating process. The solution is to add an exhaust stage during the heating cycle to ensure the use of dry raw materials, and may require adjusting the heating rate.
How to avoid fusion lines in rotary formed products?
Rotary forming usually does not produce fusion lines, but if it does, it may be due to sharp corners or insufficiently smooth surfaces inside the mold, which prevent the resin from forming a continuous coating. The solution is to inspect and modify the mold design to ensure that all surfaces are smooth and unobstructed.
Why do rotary formed products deform or have unstable dimensions?
Product deformation or dimensional instability may be caused by uneven internal stress, which may be caused by uneven cooling or unsuitable materials. The solution includes optimizing the cooling process to ensure uniform cooling of the entire product and selecting appropriate materials to reduce internal stress.
What if the surface roughness of the rotary formed product does not meet the requirements?
Surface roughness may be due to insufficient smoothness of the mold surface or improper use of release agents. The solution is to improve the surface smoothness of the mold and use the release agent correctly, while ensuring that the mold is clean and pollution-free before use.
How to deal with color inconsistency or spots in rotary formed products?
Inconsistent colors or spots may be due to uneven mixing of raw materials or poor dispersion of pigments. The solution is to ensure that the raw materials and color additives are thoroughly mixed and maintain consistent processing conditions during the production process.
